The Development and story of the game

Simone Guggiari - September 14th, 2019

The following is a devlog of the game That Failed Bank Robbery, a game that was developed in a team of 5 students as part of the lecture Game Programming Laboratory at ETH Zürich between February and May 2018.

The game came 2nd overall in the lecture competition and was showcased at Gamescom 2018 as part of ProHelvetia’s delegation of #SwissGames. It was also exhibited at the Zürich Game Show 2018, Switzerland’s biggest gaming event, as well as Ludicious 2019. 

The game is about robbing banks. The great bank of Switzerland, to be precise. Two teams of dumb thieves try to rob the same bank at the same time, with unexpected consequences. Drive unlikely vehicles, pick up all the cash, steal your opponent’s loot, use a vast arsenal of different power-ups, and get out there before the police catch you!

If you haven’t seen or played the game yet, you can check out the trailer and screenshots below, and try it out for free by downloading it via itch.io. The game also features local multiplayer for 2-4 players so you can challenge your friends.

A screenshot from the final game.

You can also find a design document written by the whole team during development here. The design document goes more in-depth into the challenges we faced during the development and their solutions. This post goes more in-depth into what the course is about, our organization, the engine development, and what happened after the course with the game.

The Course

During the Master in Computer Science at ETH, there are several laboratories one can choose from. Laboratories are different from regular lectures because their focus is on the practical application of the concepts learned during the studies rather than only their theoretical understanding. That’s why labs usually don’t have a final exam but feature a big project to do during the semester, often in a team with other students. Among these labs, there is one, in particular, I was waiting to attend since my first year at ETH: the Game Programming Lab.

The Lab professor, Prof. Robert W. Sumner, decides every year a theme that the games in the lab should follow. Previous years had themes such as Food, Seasons, Jungle, and during the first lecture, he announced the theme for this year: Alfred Escher. Alfred Escher was the founder of many things, including ETH (our institute), SBB (the Swiss Railways) and Credit Suisse (the well-known bank). We were a little disappointed, mostly because we didn’t know how we could connect this theme with a game.

He did a bunch of things. He deserves the glasses.
The team logo, made by Elissa Guggiari.

Afterward, there was a sort of “speed dating” in which everybody could quickly get to know the other students taking the course, to form groups. After exchanging idea about the type of game each wanted to do with other students, we quickly formed our group. There were 5 of us: Nicolas Huart, Andreas Emch, Alexander Lelidis, Xinge Tian, and me, Simone Guggiari. We were all computer science students. We decided our team would be named Escher’s 11Escher’s 5 would probably have been more appropriate, but we weren’t sure the reference would have been that straightforward.

The next step was to come up with an idea for a game that would fit the theme and would be programmable and developable in the next 14 weeks, the duration of a semester.

The Game Idea and Prototypes

There were quite a few brainstorming sessions, in which each team-member expressed ideas about what he thought the game should be about, the mechanics and features that would be cool. Working with the theme of Alfred Escher, in the end, we settled on the part of his life in which he founded one of the biggest banks of Switzerland, Credit Suisse. And what could you do in a game about banks? Well, rob them, of course!

Brainstorming the game mechanics.
Simple programmer art for the game concept.

We decided that we would develop a game in which each player had to go inside the bank, collect as much cash as possible while avoiding the police, and get out before the time run out. Players could further use power-ups to disrupt the opponents, find special items to unlock secret vaults and passages. We wanted to feature multiplayer, both cooperative and competitive, with two teams of two players each, that had to compete to see who was the better robber. We thought this aspect would help create a more compelling game since players then had both to cooperate and communicate in the team as well as compete against the others.

We decided that to make the game more fast-paced and fun, the players would be going inside the bank with vehicles rather than on foot. Doing so also helped with the fact that MonoGame, the framework we were using, didn’t have skeletal animation.

To make the game a bit more strategic, we decided that the more cash and gold a player was carrying, the slower he would be moving. This is a central game mechanic since players now have a trade-off between how greedy they are, and how likely it is that they will be caught. By moving slower, players were more likely to be either caught by the police, or by a power-up used by an enemy player.

From the beginning, we decided we wanted to follow a set of guidelines while developing the game. We thought about what are the essential characteristics of a game, and we came up with 3. We decided that the game should be

  • Fun (duh)
  • Beautiful
  • Simple

We always tried to remember these distinct points when working on a game mechanic, especially the ‘simple’ part.

The three symbolic pillars in our design process.

We also developed a paper prototype to test out the mechanics. It wasn’t easy to test out the ideas on paper, since we were going for a fast-paced, chaotic game. The prototype helped us nonetheless to understand the mechanics better and smooth some rough edges. An expanded discussion of the paper prototype is also present in the design document.

Early sessions, trying to figure out on paper how the game would play.

The map layout was deeper than wide, to force players to have more interaction, as well as also making going to the back part of the bank riskier. The back of the bank would have the best loot, but by having to travel this far one was also more vulnerable. Players then had to choose among different strategies, low-risk low-reward by playing towards the front, close to the base, or high-risk high-reward by exploring the more remote parts of the bank.

You can see one of the first level designs of the map below, as well as a rough box prototype in-game.

Initial level design with several game elements and the risk-vs-reward mechanic.
One of the early box maps in MonoGame to test out the gameplay.

Since we were all big fans of procedural generation, we decided we wanted to place power-ups and loot procedurally, based on the state of the game and who was winning. This would make the experience more fun.

The core pieces of our game. Fast-paced action while racing with vehicles and a layer of strategy on top with procedural loot.
The schematic showcasing the main elements of our game and how they interact with each other.

Project Structure, Time Management, and Methodology

The duration of a single semester is 14 weeks, 15 if you count the weak of easter break in the middle. The game had to be ready in time for the final presentation, which happened the last week of the semester. We, therefore, had a total of 14 weeks, after the team creation, to come up with an idea, create a working prototype, game assets, playtest, refine, debug and polish our game to a presentable state.

The course is further divided into 5 stages. At the end of each, you have to show a working demo of the game. These are:

  • Functional target: basically something moving on the screen.
  • Low target: a playable, bare-bone game.
  • Desired target: the target if things go reasonably well.
  • High target: the goal if things go very well.
  • Extra target: things not achievable in the time of the course, but possible features to implement later.

You can read more about what went into each stage in the design document.

In each team, everybody is a game designer. Everybody can suggest ideas, propose changes, and have an influence on how the game turns out. There is also one producer, who is responsible for the management and organization of the team, making sure the project follows the planned schedule and that the demos are delivered on time. He also has the responsibility of managing unexpected problems that might (or better, definitely will) come up during the development.
I always enjoyed organizing, scheduling, and already had some experience with game development, so the team and I decided I should take upon this role.

I now had the responsibility to come up with a schedule and to decide how to split up our work.

I listed all the categories relevant for the development of our game, from low-level aspects, engine programming to asset creation, audio, testing, and polishing. I then divided the work among the 5 stages discussed earlier. This table was a godsend in retrospect as it helped us to have a good overview of the progress of the game, where we were falling behind and where we needed to put more effort. You can see the table below

Category table

We decided we would work in an agile fashion, having weekly sprints in which each team member had a specific set of tasks to achieve for the week. We would then meet the following week, discuss what we accomplished, and show the new features, test out the game and decide what to include in the next sprint. We could adjust this to stay on schedule and also to incorporate feedback based on playtesting. We would then split the work among us. Each of us had a few fields of responsibility, for example, physics, engine, UI, gameplay, assets creation, menu, particles, integration, deployment, and such.
I was mainly responsible for the engine creation and gameplay logic programming. Andreas was responsible for the physics engine and the integration and deployment. Nicolas had level design, menus, and UI. Xinge and Alex had effects, particles, and document creation, as well as some assets creation.
You can read the specifics of what each team member was responsible for in the design document.

We had a weekly budget of hours to fill. We estimated around 20 hours weekly in the beginning (this was a 10 credit course, so this was reasonable, although already high for other similar lectures). It wasn’t uncommon, especially in the final weeks, to go up to 40+ hours for this lecture alone. It was fun.

Weekly tasks table

The table that helped us schedule the weekly work. Each member has a list of tasks, with title and description and estimated amount of hours required (1, 2, 4, 8). Upon completion, he marks the entry green and writes the number of hours it took. Features that weren’t completed were marked in either orange or red, depending on the severity. In the next weekly sprint, they could either be completed or removed if there were tasks with higher priority.

The Engine and MonoGame

The goal of the course is to apply many of the concepts learned during the study in computer science, and so the professor opted for a bare-bone framework called MonoGame, a successor of Microsoft’s XNA.

This framework allowed us to get access to low-level components, such as polling input (keyboard, mouse, gamepad). It also allowed us to create a window, and gave us a basic facility for displaying graphics with default shaders. The framework somewhat shielded us from having to interface directly with the graphics API, although this was still required to create better effects and shaders.

Everything else had to be programmed, including the game loop, the object management, allocation, components, physics, UI placement, and object drawing. Monogame also doesn’t offer a level editor or graphic interface, so even there, one has to implement his/her own system. It was going to be a fun challenge.

This is in contrast with from Unity since Unity provides all of those features out of the box.

I had quite some experience with Unity and knew the difference those features make in ease and speed of development. I decided that before starting to code the game, I would create a basic engine that could provide the most used functionality.
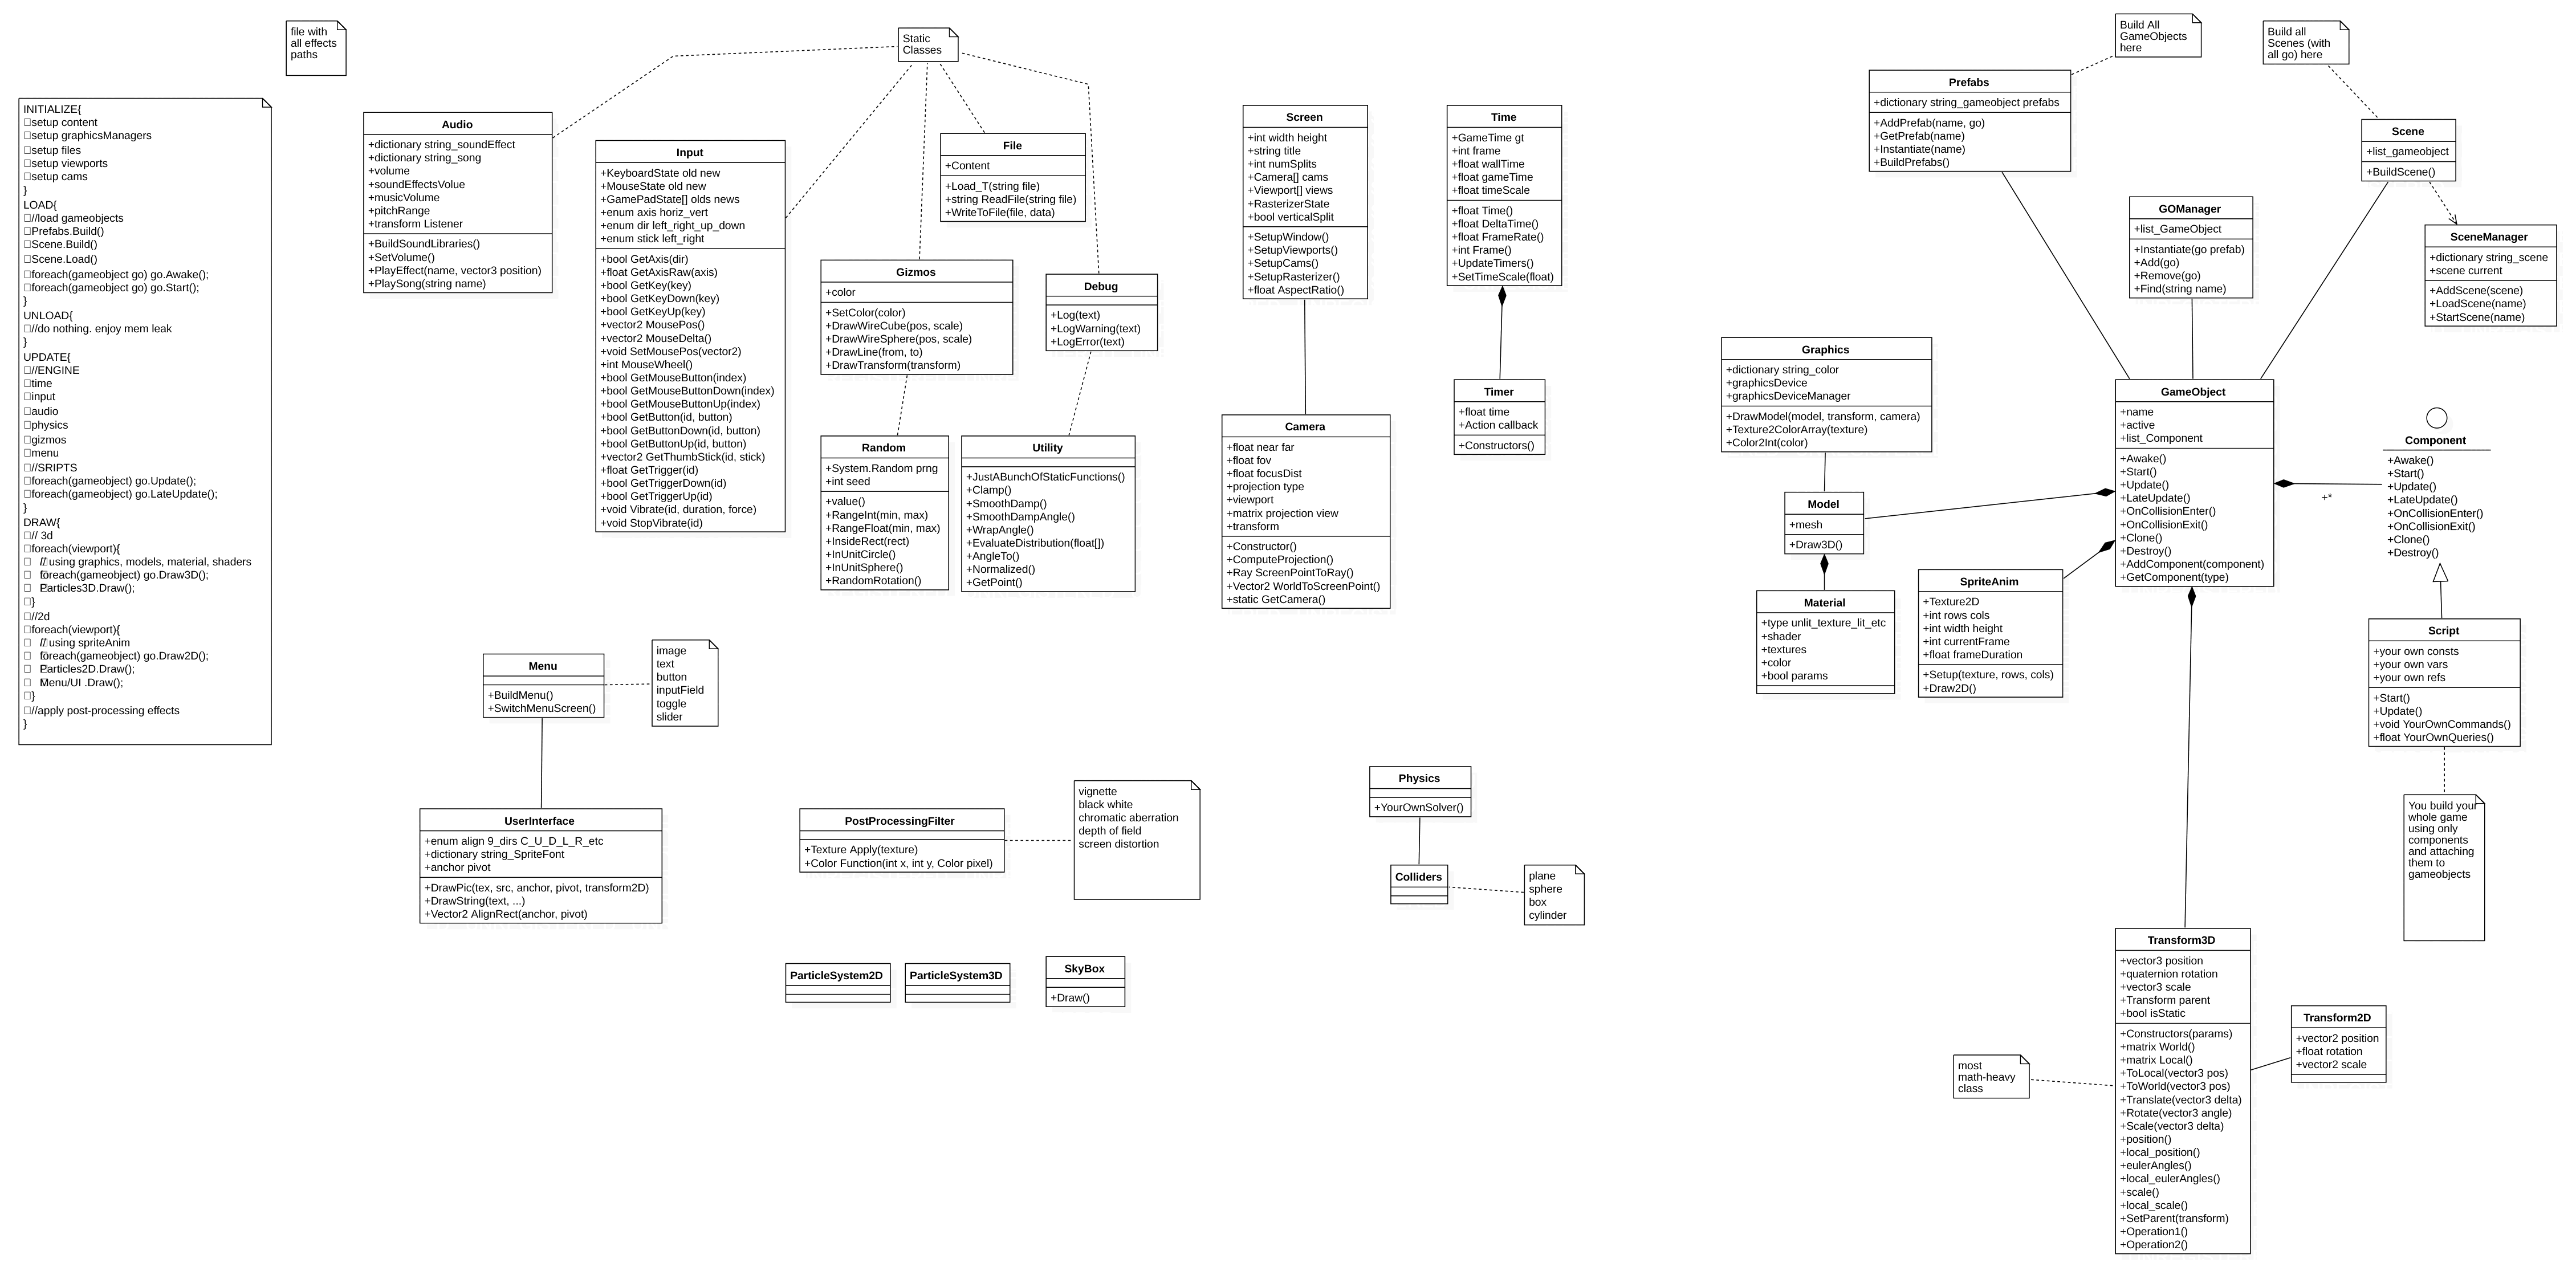
These included:

  • Game loop:

to abstract away the creation of the different devices required by the framework and to provide a loop with startup, update, and shutdown. It also decouples the logic from the rendering to ensure a smooth framerate and deterministic logic.

  • GameObject model:

allows easy instantiation, management, and removal of objects, for storing them in scenes and levels. Also features a prefab system used to easily create and spawn dynamic objects at runtime without having to create them manually.

  • Component model:

allow all our game logic to be in small, encapsulated and independent scripts that would be called automatically, simplifying the implementation of gameplay. Scripts can communicate with each other via well-defined interfaces.

  • Transform:

used to provide an easy interface to translate, rotate, and scale objects, as well as parent objects to others without having to deal directly with transformation matrices.

  • Audio system:

allows music and sound effects playback without having to worry about loading files. Provides a global setting for volume and pitch and also offers 3D spatial sound with 3D listeners and sound generation.

  • Basic filesystem, logging, and math utilities:

a unified interface to load assets, including textures, audio, models, and shaders, that ensures catching errors correctly. Logging and debug drawing facilities to aid in development were also created, to display messages of different categories in the console and drawing 3D primitives (spheres and AABB) in the scene.

  • Time utilities:

used to manage the time, the framerate and the time between frames. Also has a robust system of callbacks that would help in our game logic.

  • Input management:

detects input events, such as key-presses, mouse movement, and gamepad buttons without having to embed polling code in the game logic explicitly.

  • Material, model, and shader system:

encapsulates textures, shaders, and models on a per-gameobject basis, to ensure models are automatically drawn with the right properties, textures, and shaders at the correct transform. Also provides basic primitives.

  • Camera and screen:

used to manage view matrix and camera projection behind an easy to use interface. Also handles screen size, viewports, and split-screen.

  • Menu and UI:

essential components to use inside menus, such as on-screen images, text, buttons, and sliders. These are dynamically placed using anchors to ensure the right placement independent of the screen resolution.

  • Post-processing filters:

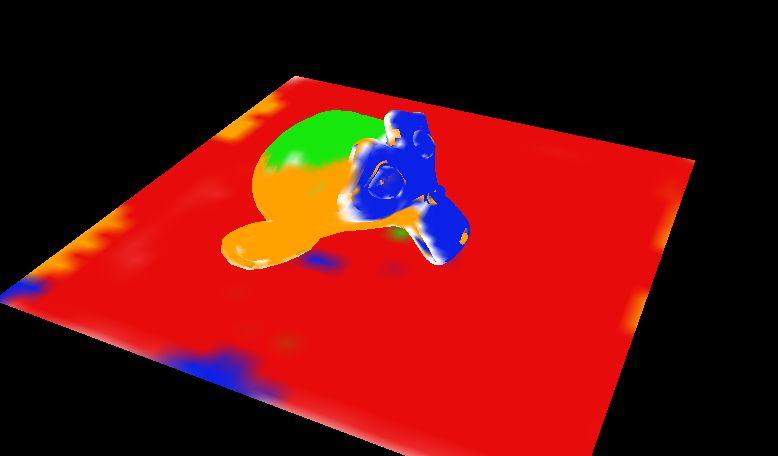
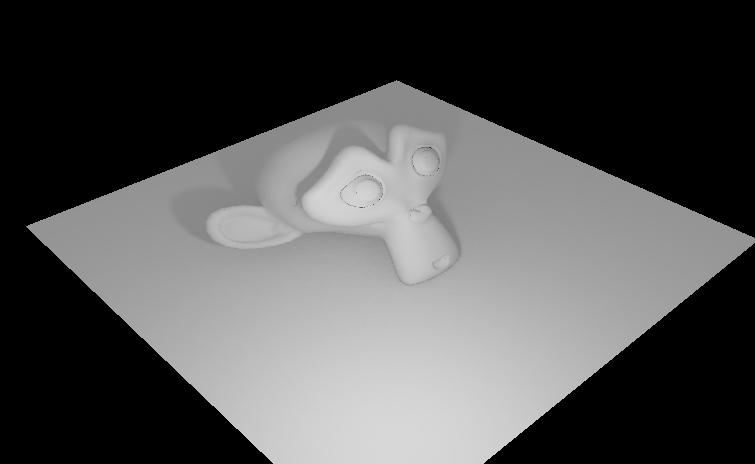
a simple interface to add post-processing filters to enhance the look of the game.

UML diagram showcasing the organization of the different components in the engine.

Of all those tasks, the most challenging were the correct management of object creation, cloning, and destruction via prefabs, as well as the storage into distinct scenes that could be loaded. We had some problems due to parallelisms and concurrency, but we were able to fix them. The transform class that was extremely math heavy also required a lot of thinking and time, but in the end, it made the development of the game much more natural and straightforward.

We started the development of the engine early, to ensure we would have enough time. It took us around 3 weeks before all the essential features were completed and tested. During this stage, we also developed a very rough game prototype to test out the features we were implementing.

What I learned in this phase – what features are required in a basic engine and how to structure them – was the basis for a presentation I gave the next year in the same lecture. In this presentation, I explained to the students the different components and classes and a possible organization to make development easier. You can find the presentation “How not to completely mess up your code” here.

Progress

In this section, I’m going to highlight some of the stages we went through while developing the game. These are split into the 5 stages previously discussed. As mentioned earlier, the design document goes more in-depth in the features implemented in each phase, here I’m going briefly over each stage to avoid repetition.

Functional Target

In the functional minimum, we had a vehicle moving on the screen, that could collect the small spheres (cash), and a rough UI on the screen. Although this doesn’t look like much and could be developed in a few hours in Unity, it took a few weeks in MonoGame. The reason for this is that the stage also included a big chunk of the engine, drawing, input, and loop. You can see the image below.

A small forklift moves on the map and collects spheres.

Low Target

For the low target, we worked on creating a basic level to give a sense of space to the player. We also implemented collisions with the environment via our physics system, created a mini-map, the full game flow with rounds and also implemented several power-ups, including keys opening the special vault. We also started on importing assets into the game. For this, we created a particular system that exported our generated levels directly from Unity. We could import our assets in Unity and use the editor to create the levels. A script would then export all the transform information for the assets into a file and import it into MonoGame. There were some troubles with the different coordinate systems and parenting, though, but we resolved everything in the end. We also implemented split-screen and support for 2 players to start testing out the competitive aspects of the game.

The result of a few more weeks of work. Split-screen and multiplayer implemented, with several more game elements, mini-map, cash, and secret vault.
Early tests of importing assets into MonoGame with our custom scripts.
The physics system in action, with the player going through a barrage of boxes.

Andreas did a great job with the physics system, as you can see in this gif. It adds a level of interactivity to the game that makes it more fun to drive around and bump into things.

Desired Target

For the desired target, we aimed at having a game that would look and feel like the real thing. We worked mostly on replacing all the ugly grey-boxes with assets. We modeled some of the assets ourselves, especially the main ones. Since we were all programmers, we decided to focus our efforts on what we could do best and use pre-made assets. In retrospect, was a debatable choice, as it removed from the individual feel of the game, making it feel more generic. It would probably have been better to either hire an external artist or try to do the assets ourselves. It would have been much more time consuming and take time away from the other development aspects but would have resulted in a more personal look. We also refined the UI, as can be seen in the following screenshot.

The result, once we reached the desired target. Levels and assets are now in the game, with a revamped UI and more game mechanics.
Blender's default monkey, Suzanne, with a custom paint job.
Early shader tests to combine baked lighting with texture color in HLSL.
The artistic result.

MonoGame provides a basic shader, but it doesn’t look that good as it implements a basic version of Gouraud shading. We decided to use baked lightmaps to make the game look better without having to implement a complex model ourselves. Once the map was put together, we would import the models in Blender, create a single huge static mesh, and bake lighting into it.
In MonoGame we had a simple shader with 2 sets of UVs. One was used to read the flat-shaded color of the models, whereas the other was used to read the lighting. The colors were mixed by multiplying them to obtain the final color.

Flat shaded map.
Simulated lighting inside Blender.
The final shaded map in our game.
The texture used for the game assets. Originally by Synty Studios, tweaked a bit to give our flair to the game.
The baked light information for a part of our map.

PlayTest

At this point, we run a playtest with students and friends, to test out the game and receive feedback on what was and wasn’t working. This gave us enough time to tweak and fix it. We rented a lecture room for a full afternoon with a huge projector and invited friends and colleagues to play the game.

The lecture room in which we did the playtest. Using the projector to play games rather than to read slides was a welcome change.
Some more playtesting.
A frenetic 2v2 game.

We also had questionnaires to help pinpoint where to make changes. The feedback was positive overall, but we discovered several issues, some small, such as changes in the UI, some bigger, such as gameplay refinements or bugs. After analyzing feedback and deciding what to implement, we had over 150 changes to do. We were able to implement most of them in the following weeks.

High Target

For the high target, we worked on some additional features. We had police cars chase you in different patterns with basic UI. We added particle effects, some billboards 2D, some 3D with custom implemented particle system.

effect_smoke
3D particle system to simulate vault smoke.
effect_particle
Billboard particle to simulate smaller effects.
effect_lens
Lens flares were also added.
effect_police
Police AI with blinking lights.

We added tutorials to help players learn what to do in the early stages of the game. We also implemented a context-sensitive system in which the two robbers would appear on the screen and give tips or talk, based on what was going on in the game. This system “knows” the state of the game and can fire events at the right time, depending on the situation. An appropriate line of dialog is going to be selected, and a robber will say it. I also implemented this system in another one of my games, rainforest, Inc.

Contextual dialogue system with robbers providing tips to help the players.

We also decided to experiment with a procedural loot spawning system. We would analyze where players were more likely to move by using a heatmap that showed how players would behave inside a level. We could then combine this information with a custom hand-drawn distribution for power-ups, cash, and gold. The game would decide where to spawn the items based on the risk-reward mechanics discussed in the early chapters. This system made the game more fun and balanced (and also produced some sweet images to show in the final presentation!)

Left: bank as seen from above. Middle: playable area (black) and colliders (white). Right: heatmap showcasing player movement. The bases are at the bottom.
Three hand-painted distributions to instruct the engine on how to distribute power-ups, cash, and gold.

We also intended to implement post-processing effects to make the game more lively. We implemented grayscale, color grading via LUT (look-up table), vignette, chromatic aberration, and blur. The LUT is particularly interesting as we can encode a mapping from RGB to RGB, that uses the LUT table to look up how to modify the color of a pixel.

16x16x16 LUTs used to color-grade the game cheaply.

Extra Target

Since we completed all the previous phases within the allotted time, we decided to implement some of the features we initially thought unattainable. These were the features we had put in the extra target. Among this, there were multiple maps, that we set in a bank with a park in the middle, the ability to buy power-ups between rounds and improved navigation and police AI.

A screenshot from the final game with effects and tutorial added.

The week before the presentation, we suddenly discovered that our game was running at less than 10 fps (when going well, otherwise 3 fps). It was in part due to the number of effects we had implemented. We panicked. Andreas was, however, a great programmer and was able to implement instance rendering in a short time and make the game rerun at 30 fps. Instance rendering is a technique where primitives are sent to the graphics card only once and then rendered multiple times by using different transformations. Doing so saves time since vertex and index buffers have to be sent only once per object type rather than one for each object and also helps with caching. It is an instantiation of the flyweight pattern described by the Gang of Four in Design Patterns and by Robert Nystrom in his excellent book Game Programming Patterns. With the system in place, we were ready for the final presentation.

Finished Game

Time was up! The final presentation was approaching, but we still had to do a few things. You can see a gif showcasing the gameplay below:

Some highlights of the bank-robbing action.

Trailer

For the final presentation, we wanted to stun the audience by showing a well-polished and professional trailer. We worked with an external artist as well as a professional sounding voice actor to create the trailer, by mixing parts of the story told via comic drawings and parallax, to elements of gameplay.
Since many asked, we found the voice actor on voicebunny.com. The artist we worked with was Wenart Gunadi, an extremely talented artist that already did art for several of my other projects. You can check out the trailer here.

High-quality storyboard for the trailer.
Speaks for itself.

Presentation

There were 6 teams programming games this year. We had an exact 8 minutes for the final presentation. We had rehearsed it many times, and the excitement when going on stage was palpable. I had gone to every single presentation the previous years and had been waiting for so long to be on the stage presenting.
You can find the video of the final presentation of all groups, including ours, below. The slides we used can be found here.

There were two awards, one given by the jury of developers at Studio Gobo and one of the public. Although we didn’t win and were somewhat disappointed at the moment, I can now say that the game that won fully deserved it. The game, Unrailed, is now available on Steam and is extremely fun, so check it out.
It was incredible to present our game in front of such a big audience, and the experience was priceless. This was, without a doubt, one of the best courses I took at ETH. We also got a beautiful certificate at the end!

Exhibitions

After the course finished, we were lucky enough to showcase our game at several exhibitions, including Gamescom 2018 as part of ProHelvetia’s delegation of #SwissGames, the Zürich Game Show 2018, Switzerland’s biggest gaming event, as well as Ludicious 2019.

Gamescom 2018 with ProHelvetia and #SwissGames

During the final weeks of the course, the professor told us that ProHelvetia – the Swiss Arts Council – was looking for games to take part of their delegation of SwissGames at Gamescom 2018 in Cologne, Germany. We jumped on the opportunity and quickly put together the necessary material (pitch).

After a few weeks, we were told we had been accepted and were now part of the delegation. We couldn’t contain our joy! Our small student project would be exposed at Europe’s biggest gaming event.

There were several meeting with ProHelvetia and the other teams whose games were part of the delegation. You can find a comprehensive list of the games here.

Most notably another game, also developed as part of the course was present: Unrailed.

The game is available as an early access title on Steam at the time of writing this blog. It is an excellent, fun and charming game made by a team of incredibly talented developers, so do check it out:

A screenshot from the charming rail-building game Unrailed.

The Swiss delegation, and therefore also our game, was exposed in the business part of Gamescom, and not the entertainment part, which meant the public were mostly journalist, developers, and publishers.
During the event, we had the opportunity to come into contact with many publishers and other developers, who tried out the game and gave us constructive feedback. The experience was great and enjoyable. We learned a lot and met a lot of interesting and talented people.

The Swiss delegation of developers at Gamescom.
The red-tinted Swiss booth.
An article in the newspaper 20 minutes about the games exposed.
Part of the team in front of our booth.

Zürich Game Show

During Gamescom, we met Asif Hanafi, one of the organizers of the Zürich Game Show, a convention in Zürich in which developers showcase their projects to the public. Many big studios take part in this event, such as Nintendo, CD Project Red, and many others, as well as the smaller indie Swiss community.

He liked our game and put us in contact with one of the organizers of the event, who offered us a booth to showcase it at the convention. We were thrilled.

The convention was entertaining, and there were a lot of players trying out or game. We received a lot of feedback. It was especially good to see the little kids learn to play the game in a few instants and then try to teach it to their parent. At the event, I also showcased one of my other games, rainforest, Inc.

Happiness upon completion of the booth-building process.
Testing the game.

Ludicious 2019 and Business Accelerator

Ludicious is a local conference and exhibition in which game developers come together to discuss, hear speakers from the industry, and showcase their latest games during three days. It is a smaller event compared to the others discussed above, and more geared towards developers rather than players. The conference has steadily grown since 2014 when it initially took place. There are tracks curated by both ETH Zürich and the Zürich University of the Arts (ZHdK)I had taken part every year since its first appearance and was extremely pleased to be able to showcase our project this year.

Some games were selected to be part of the Business Accelerator, a program meant to help new studios and developers learn the business part of making games. We were chosen to be part of this program, which made us also extremely happy and honored.

We took part in VentureLab, a 5 days course spread over several months in which entrepreneurs, lawyers, managers, accountants, and investors would explain to us the ins and outs of creating a start-up, founding it and bringing a product to market.

The projects taking part in the Ludicious Business Accelerator.
One of the pitches, by Olga Peters.

The course was great, and we learned a lot. We also had the opportunity to have pitches with investors and talk with coaches regarding our particular project.

At Ludicious, we also had several meetings with publishers interested in the game via the platform MeetToMatch and pitched the game on stage in front of other developers and investors.
We also showcased the game in the main hall, in which the public could come and test out the games. There we also met many interesting people and many other developers that also had excellent and innovative games.

My pitch at Ludicious for That Failed Bank Robbery.
Future computer science students try out our game at ETH's information days.
The exposition part of the convention, with a lot of interesting and innovative games.
Our booth at the show.

Conclusion

This wraps up my post about the creation, development, and exposition of our game, That Failed Bank Robbery. It was an incredible journey, and I could never have thought that this school project would have brought us this far. I was lucky to have such a talented team to develop the game with, as well as incredibly generous people along the way that helped us get the game to the several exhibitions mentioned above. These included ProHelvetia and the SGDA, the Swiss Game Developers Association, as well as all the people from the GTC, the Game Technology Center.

I hope the read was enjoyable and that it gave some insights into the development of the game and what we did afterward.

Thanks for reading. Cheers!

-Simone